Rise of the Necromancers, Campaign Log 3
Last week Dra’mour and Orbuhl barely escaped the ruins beneath Stormrest. This week we follow them into the crypts to kill the necromancer Shaldri Breathtaker.
Weekly
Actions
Each
week, Mythic are able to undertake 2 actions before generating
adventures (3 with the help of an ally). With his ankle broken
Dra’mour makes his way to a local surgeon to see if they can heal
it. He pays 5 valuables, and I roll a D6. I roll a 5, which means
some progress has been made toward healing the injury, and for each
subsequent visit I’ll subtract 1 from the roll until I get a 1,
which will mean it has been healed and I can remove it from his sheet.
Had I originally rolled a 6 the injury would have been deemed beyond the scope
of conventional medicine, and Dra’mour would have had to find
another way to treat it.
For his second action Dra’mour
heads to the market. I had forgotten to roll to see if Dra'mour equipment became damaged during the last adventure, so I do that now, finding both his large shield and one handed weapon were damaged in his fall. He sells one of the squirrel toes and pays 5V in order to get those repaired.
Next he buys two light weapons for Orbuhl, one
to replace the one lost while escaping from the dwarven quarreler,
and another as a backup. Unfortunately, because of the raids on the
merchants, Dra’mour has to pay double the usual cost.
Generating Adventures
1: Crisis adventure, kill character
2: Crisis adventure, transport item3: Patron adventure, two goals: retrieve item & gather information
Because
the goal card for the patron adventure was a joker, I draw two
additional goal cards, which would mean more work, but also increased
rewards.
Dra’mour decides to check out the kill character
adventure first. We see based on the adventure difficulty that there
is a bounty on a novice necromancer. I draw three cards, and discover
he is an elf, though he has no traits. I roll a d10 twice, but the
boost to his first mobility number is canceled out by a penalty to
his first mobility number, so no changes to his stats to remember. I
give him a name: Shaldri Breathtaker
Time
for some chorus questions:
"Is Shaldri one of the necromancers
coordinating the attacks? 6, No."
"Are they in charge of excavating the tunnels? 4, No, and they aren’t really ‘in charge’ of anything"
"Is
Shaldri one of the necromancers responsible for Lharian’s death,
the merchant Dra’mour was friends with? 4, No, and Shaldri isn’t
even participating in these attacks."
"Is someone offering
information about the raids in exchange for Shaldri’ s death? 2,
No, but they are willing to lend aid in repelling them."
Dra’mour isn’t too keen on mysterious benefactors, doubly so when they’re asking for someone to be killed, However, with no support from the town guard it looks like this is his best option going forward. He could investigate the gather information adventure, but those require Lore challenges, and as established, Dra’mour’s logic isn’t his strength. There is nothing else Dra’mour needs to buy, and he can’t afford a mercenary so he heads out toward the crypt Shaldri is residing in.
Dra’mour
and Orbuhl find themselves outside the ancient dwarven tunnels, now
turned to crypts where the necromancer Shaldri is said
to be plying their dark arts. I decide to ask a chorus
question: “Are the markings in dwarven? 6, No, they’re too fresh,
and written in blood” Maybe a warning, maybe instructions for other
fell sorcerers that try to visit. Orbuhl takes a crack at deciphering
them first, rolling a 9 and quickly getting frustrated due to the messy
writing, and unfamiliar patterns. Dra’mour tries next, rolling a 16
and cursing that he never paid attention when the scholars would
lecture long about the importance of ciphers. Back when he was a
scout he had a whole team he could count on for this kind of
thing...now it’s just him and Orbuhl, and neither of them is adept
at this kind of work.
Because they both failed, they’re now
Frustrated (Penatly(1) to Lg-, Cn-, and Rv+) for the next encounter,
AND the next encounter has it’s difficulty increased by 1. No loot
(failed to successfully resolve the encounter) and no narrative
(rolled a 9)
Encounter
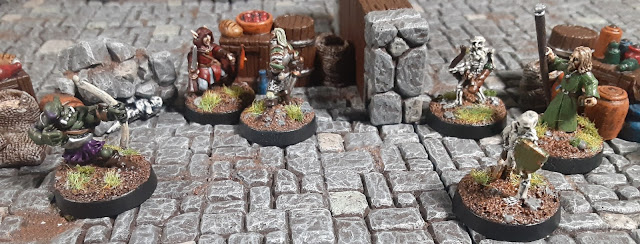
2: Adversaries: 12x16 area, 4 Skeletons, 1 Novice Necromancer
When
Dra’mour failed to heed the markings outside, a magical ward was
activated, which drew the attention of one of the necromancers
working with Shaldri. (usually at difficulty 1 there would only have
been 4 skeletons, but at difficulty 2 a necromancer becomes part of
the encounter.) Dra’mour and Orbuhl are met face to face with the
necromancer and their skeletons, but at least have their wits
together enough to win initiative, rolling a 3.
Dra’mour
Turn 1
Orbuhl
shoots at the approaching skeleton, but misses terribly, having been
startled by their sudden approach. The skeleton, for their part,
whips a dagger at Orbuhl, who thankfully dodges out of its way. (The
skeleton rolled a 1 when they were attacked at range, which gives
them the chance to take one of a few retaliatory actions, such as a
free movement action, or returning fire)
Not wanting to get
overwhelmed Dra’mour moves in and quickly smashes apart the offending
skeleton
Adversaries
Turn 1
The
necromancer curses, makes an arcane gesture, and a shard of bone
flies directly toward Dra’mour! Thankfully he dodges out of
the way just in time! (Bone spike is an exceptional ability that
novice necromancers have at their disposal in lieu of a normal ranged
attack, using their Logic(Lg-) rather than their
Finesse(Fn-) to attack with.
The necromancer treards backwards, attempting
to get away from Dra’mour while the skeletons, which would normally
stand around and mind their own business if they couldn’t perceive
an enemy, come to the necromancer’s defence due to their command
undead ability. The skeleton near Dra’mour moves forward and
attacks, though is no match for him, and ends up staggered.
Dramour
Turn 2
Taking
the opportunity to strike while the skeleton is off balance, Dra’mour
cuts it down with a blow it has no hope of resisting.
Orbuhl
targets the necromancer, and manages to lodge an arrow firmly into
their arm, despite their hiding behind a wall.
Dra’mour
and Orbuhl both make for cover, not wanting to become a target for
the necromancer’s arcane attacks.
Adversaries
Turn 2
The
necromancer moves to the other side of the wall, and summons another
arcane bone spike, but Orbuhl manages to tumble out of its
path. The skeletons, unable to perceive anyone move to
protect their master.
Dra’mour
Turn 3
Orbuhl,
remembering their training as a scout, fires at the necromancer and
drops them, an arrow protruding from their gut as they slump face down. "Always kill the arcanist first!"
Dra’mour
cautiously moves forward.
Adversaries
Turn 3
The
skeletons, now without the necromancer around to control them,
shamble toward Dra’mour and Orbuhl.
Dra’mour
Turn 4
Dra’mour
engages the skelton, but only manages to push it away, then moves
backwards toward the entrance.
Orbuhl backs off as well and
lets an arrow fly, shattering a different skeleton into pieces.
Adversaries
Turn 4
The
remaining skeleton doesn’t have sufficient logic to take a break test, so
just moves forward to engage Dra’mour.
Dra’mour
Turn 5
Dra’mour
fights off the skeleton, managing another push and falls back while
Orbuhl advances and shoots at the skeleton, who defelects the arrow and moves forward.
Adversaries
Turn 5
The
skeleton moves forward and wins the ensuing melee. Dra’mour rolls a
1 to resist trauma, but spends a Myth to instead become
staggered.
Dra’mour
Turn 6
Dra’mour
disengages, not wanting to fight while staggered if possible, while
Orbuhl takes a close range shot at the skeleton, knocking it prone.
Orbuhl puts away their bow and draws their one handed
weapon.
Adversaries
Turn 6
The
skeleton stands and engages Orbuhl.
Dra’mour
Turn 7
Dra’mour recovers from being staggered and reengages. Orbuhl, feeling confident with just one skeleton remaining takes a swing at it, but they gets rebuffed, avoiding being injured, but are staggered instead.
Adversaries
Turn 7
I
roll a D6 to determine which character the skeleton attacks, ending
up with a 1 for Dra’mour. Both the skeleton and Dra’mour roll a
3, so break apart from the deadlock, the skeleton running into the
wall and becomes staggered. It spends its next action recovering from
the stagger.
Dra’mour
Turn 8
At
this point Orbuhl pulls out a light weapon and hurls it at point
blank range, catching the skeleton in the jaw and shattering its
skull! The power that animated it fades and it falls to the
floor in a clatter of equipment and bones.
Post
Encounter
Dra’mour
is still frustrated from the earlier event encounter, so I roll their
Rv+ with a Penalty(1) vs TN7 and get a 4, so no Myth recovered. I
roll a 6 for Narrative, which means we’ve found out something about
one of the followers on the adventure. I ask some Chorus questions:
“Was Orbuhl a scout during the times of the pale madness (See
Dra’mour backstory in campaign log 1) 4: No, and they had only just
become a recruit when Dra’mour decided to head to Stormrest.”
This must mean that Orbuhl followed Dra’mour for reasons other than
their time serving together as scouts.
“Did Orbuhl follow Dra’mour
because they believed they could learn more from Dra’mour than
staying on as a scout in Crowhaven? 2, No, but Orbuhl did
decide to follow Dra’mour because of his reputation.” I leave it
there for now, wondering why Orbuhl left Crowhaven so soon after
becoming a scout...maybe they saw binding themselves to Dra’mour as
a way to escape something? I’ll have to leave that for another
time...
Fame and Fortune reveals we get 2 reward cards, and
when I go to loot their equipment I realize that the skeletons should
have been taking penalities to their melee rolls all along, because their
equipment starts with the Damaged trait. Oh well, no harm, just have
to remember that going forward. I end up with 10V, a pouch of choking
dust (staggers an opponent on a successful ranged attack), and Orbuhl
retrieves their thrown light weapon.
Encounter
3: Event: Spider Eggs
Dra’mour
and Orbuhl move forward into a small chamber covered in spider webs.
In the corner is a cluster of fragile spider eggs, and above and around
them hang immaculately cleaned bones, acting as a sort of alarm if disturbed. The spider eggs are valuable if retrieved, so
Orbuhl risks it, rolling manipulate Device (Fn-) vs TN6. Success!
I roll a D4 and get that many eggs, plus the adventure difficulty,
for a total of 3. If Orbuhl can get them back to Stormrest in one
piece they’ll sell for 10V each!
Post
Encounter
Rolled
a 5 for Myth recovery, no no luck there. 9 for Narrative, so nothing
there either. Fame and Fortune nets us a card, 3R, so Dra’mour and
Orbuhl have a little something to brag about after snatching those
spider eggs. No luck on locating the goal either, so time to move on
to the next encounter.
Encounter
4: Adversaries: 16x16 area, 3 Skeletons
Dra’mour
and Orbuhl wander the ruins turned crypt, stepping over the piles of
bones littering the floor from coffins broken open, the necromancer’s
desperate attempts to gather components leaving no regard for the
dignity of the interred. Soon their footsteps begin to echo, a
cavernous room stretching before them, and the creak of dry bones
answers them back.
Adversaries
Turn 1
Since
these skeletons aren’t under the control of anyone, and not a one
of them can see their opponents, they stay put.
Dra’mour
Turn 1
Sneaking
forward, Dra’mour and Orbuhl know there are skeletons in the room
but they don’t want to get tangled in with them just
yet.
Adversaries
Turn 2
More
standing about
Dra'mour
Turn 2
In
a flurry of action Orbuhl whips around the side of the wall and lets
loose an arrow, easily taking down the skeleton armed with a spear.
Dra’mour moves to attack as well, but catches
the skeleton’s bow in the jaw, staggering him.
Adversaries
Turn 3
Being
a simple set of animated bones the skeleton claws at Dra’mour, who
manages to land a solid blow, smashing across the
chamber. The great sword wielding skeleton, now sensing the intruders,
moves in.
Dra’mour
Turn 3
Dra’mour
recovers from the stagger while Orbuhl takes careful aim and shatters
the final skeleton with a well placed arrow.
Post
Encounter
Dra’mour
recovers a point of Myth. For narrative I roll a 3, so he also
discovers something about the location they’re currently in. I ask a Chorus question:
“Is this one of the newer portions of the
crypts? 2, No, but it wasn’t heavily used when it was created,
since it’s out of the way, and was meant to be filled only after
other sections were at capacity.” That makes sense why a group of
novice necromancers would be here, fighting over the scraps of poorer
locations, looking for materials. No fame or fortune to be found, and
no luck with the goal being in the next encounter.
Encounter
5: Event: Poison Trap
Finding
themselves in a narrow hallway, Orbuhl lets out a quick yelp as they
trip across a low hanging wire, which in turn causes several
vials of noxious acid to drop on the ground around them. The acid
starts billowing into deadly gas clouds and Dra’mour and Orbuhl
dash out of the hall, coughing and sputtering, but are otherwise
unharmed. Though they sustained no injury, both of them become
frustrated. (Orbuhl failed a perception challenge with a 12, and then
both characters needed to roll Rn+ TN4, or they would have received
trauma.)
Post
Encounter
I
roll for Narrative, and get a 6, another bit of information about
Orbuhl.
“Was Orbuhl fleeing something in Crowhaven? 3, Yes, but
that isn’t why they bound themselves to Dra’mour.”
“Would
they have been arrested if they were caught? 2 No, but they were
fleeing something that brought them great shame.” Dra’mour isn’t
sure how he feels about this revelation, but understands the impulse
to leave when something simply becomes too much to handle.
No fame or
fortune because the event was a failure. Dra’mour steadies himself,
sensing that this is the end and that his quarry waits in just the
next room. (The next encounter is the final one, so the adventure
goal, Shaldri, will automatically be present.)
Encounter
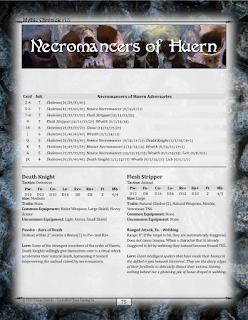
6: Adversaries: 8x16 area, 3 Skeletons, 1 Death Knight, Shaldri
Breathtaker (Novice Necromancer)
Adversaries
Turn 1
Dra’mour
and Orbuhl find themselves in a laboratory, face to face with Shaldri
Breathtaker, along with three skeletons, and a death knight! The first
skeleton launches an arrow at Dra’mour, who knocks it out of the
way with his shield and runs forward, trying to take out the death
knight as soon as possible.
Shaldri attacks Orbuhl with a
bones spike, staggering them. Dra’mour and the death knight fight,
with Dra’mour getting knocked away, stumbling into some crates.
Dra’mour
Turn 1
Dra’mour
recovers from being staggered and moves around his opponent, positioning
himself so as not to get knocked into anything, and to avoid being
shot at. Orbuhl also recovers and takes a shot at a skeleton,
destroying it.
Adversaries
Turn 2
Shaldri
sends another bone spike toward Orbuhl, who dodges out of the way.
The death knight engages Dra’mour, who loses by 3, but spends a
point of Myth to make it a loss by 1. Good thing, too, because
I end up rolling a 2 for his Rn+ and he is pushed rather than
wounded!
Dra’mour
Turn 2
Dra’mour
re-engages, and despite the Bonus(2) the death knight’s heavy armor
gives them, he is able to wound them. Orbuhl has similar luck,
threading an arrow between the barrels and urns Shaldri hides behind,
wounding him as well.
Adversaries
Turn 3
The
death knight attacks, but gets pushed back into the rubble behind
them, becoming staggered, but uses their second action to regain
their balance. Shaldri misses with another bone spike
Dra’mour
Turn 3
Dra’mour
presses their advantage, staggering the death knight. Orbuhl
fires at Shaldri again, but Shaldri dodges and manages to summon
another bone spike, though it misses as well.
Adversaries
Turn 4
The
death knight desperately attacks, though in the ensuing melee
Dra’mour just barely manages to beat them, resulting in them being
staggered again, and completely losing their feet, falling to the
floor. All Shaldri can do is fire bone spikes and curse Orbuhl as they
take cover behind the rubble, the arcane missiles shattering on the
fallen stone.
Dra’mour
Turn 4
Dra’mour
moves to plunge his blade into the knight’s exposed side, but the
knight’s sword moves to parry the blow, which would leave them in a
deadlock. Dra’mour twists fate with a point of Myth and slashes at
the knight’s now exposed arm, which leaves them needing a 3 or
better on their extremely penalized Resilience(Rn+) roll. They roll a
2. Shaldri fares no better, getting hit with another arrow and
succumbing to their wounds. Now all that’s left is to destroy the remaining skeletons
Adversaries
Turn 5
The
two skeletons move forward
Dra’mour
Turn 5
Both
Dra’mour and Orbuhl manage to roll 1’s, destroying the skeletons
and ending the encounter.
Post
Encounter
Restored
some Myth, and rolled a 4 for narrative. While doing a sweep of the
room Dra’mour discoveres something about the goal of the adventure.
Chorus Questions:
“Does he find evidence of why the mysterious figure
wanted Shaldri Killed? 1, Yes.”
“Had Shaldri harmed them in some
way? 1, Yes.”
“Had Shaldri killed someone they loved? 2, No, but
they had raised one of their ancestors from the dead, causing them
great shame and embarrassment.” At this point Dra’mour realizes
that the person that tipped them off and promised aid against the
caravan attacks must be a noble of some kind. While Dra’mour
doesn’t care to be used as a pawn to restore the pride of some rich
noble, at least they’ll be providing some relief to the merchants,
and helping put a stop to this crisis.
Fame and Fortune
reveals 4V and 8R, and stripping the death knight of their heavy
armor gives Orbuhl some additional protection.
Post
Adventure
Scavenge:
Dra’mour has 4 points of unused encumbrance, so can carry out 5V
worth of trinkets/loot. With the heavy armor, Orbuhl is at capacity,
so cannot scavenge, but they still have those 3 eggs that will be more
than worth their weight when sold. Dra’mour also gains 1 Myth, and
10 reputation for successfully completing the adventure. Finally,
because he completed a crisis adventure successfully, I put a
check in the first box of the crisis track. (The crisis track
measures how close the adventurers are to the ‘final confrontation’
which determines if and how the crisis is resolved, and ends the
campaign.)
Dra’mour meets with the person representing the
unknown noble and presents proof of Shaldri’s demise and is
promised that no expense will be spared to help reinforce the
caravans. This doesn’t mean the raids will stop, and some of them
will still likely be destroyed, or just avoid traveling at all, but
this is a start to ending the crisis. For now Dra’mour and Orbuhl
will take a well deserved night's rest, and start planning their next
move in the morning.
~~~
Let me know what you think of the playthroughs down in the comments. I think going forward I'll be focusing less on each roll/turn and doing points of interest in each encounter, as while Mythic Chronicle plays quickly, recording every roll can certainly slow things down! I'm curious to find out what caused Orbuhl to leave Crowhaven with so much shame, and what will happen next now that the merchants are receiving some reinforcement against the raids! Until next time!
Like what you saw? Get Mythic Chronicle Here
-Miniatures
by Reaper Miniatures, Splintered Light Miniatures, Battle Valor Games, Magister Militum, Alternative Armies, and Ral
Partha Europe. Cards by Brain Vessel. Mythic Chronicle is
in no way affiliated or endorsed by the companies listed.


Great article, I have shared your post here https://wargames-directory.com/forums/topic/rise-of-the-necromancers-campaign-log-3/
ReplyDeleteFeel free to join and share your work
Take care
Andy