Miniature Prep
I was asked to put together a tutorial regarding my basing technique and decided to take it a step further. Below are the steps I follow when prepping miniatures for paint. On several pictures I've circled the areas I'm talking about in orange. Enjoy!
1. Remove Flash, Sprue and Tabs
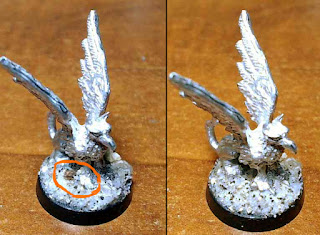
These are the little tabs and bits you'll find on metal miniatures, and come from the casting channels that are carved into molds to allow the metal to flow properly. For some miniature parts such as the bow shown below there will be channels carved into the mold to get to particularly thin parts. Just nick these off with a sharp blade and smooth out any areas from larger channels.
Most mold makers are careful about where they place these so when they're trimmed off they aren't noticeable. Pay careful attention as sometimes bits get bent up and hidden, and there is little worse than finding a bit of it when you've mostly finished painting a miniature and have to trim it off and blend in the missed area!

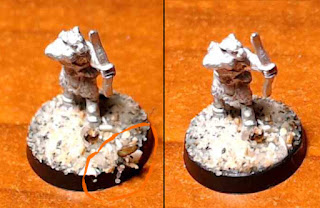
2. Mold Lines
These are a little trickier. Most miniatures are cast in a two part mold, though you'll occasionally find multi part molds for more dynamic sculpts. Along the lines where the molds meet, mold lines form, which are generally small ridges of metal. Use a duller blade when removing these and scrape at a 45 degree angle. More severe mold lines may require multiple passes, or in the worst cases some heavy scraping or even greenstuff on miniatures where the molds didn't line up properly.

3. Base Prep
After cleaning up your miniature you'll want to make sure to clean any flash from the base you'll be using, or any splinters along the edges if using wood bases.
4. Trimming and Beveling
I prefer to center the heads of miniatures as close to the center of the base as possible. There are some exceptions, but I find this gives the best visual balance. This means that you may have to trim the integral base of the miniature if there would be overhang otherwise. Use either a sharp blade, or for thicker bases a pair of pinch cutters. For very thick integral bases I use a blade to shave off some of the excess at an angle around the edges for a better transition.


5. Scoring
If you're basing a particularly a large miniature, or basing on a non textured base such as mdf or wood you'll want to score the bottom of your miniature with a blade in a cross hatch pattern. This gives the glue something to latch on to. If basing on mdf or wood I'd recommends scoring the base in the same fashion.

6. Glue To Base.
Some miniatures I'll place beforehand and get an idea of where the integral base should be relative to the edge of the base before gluing. I tend to use superglue, though have had excellent results with wood glue when gluing 6mm scale miniatures to plywood bases. Apply the glue to the miniature's integral base and place it down.
7. White Glue
My wife got me a 1 gallon jug of white school glue last year, and previous to that I had just been buying smaller squeeze bottles after the school year had begun when they go on sale very cheaply. You'll want to squeeze a reasonable amount of glue onto a palette and find yourself a crappy old brush. The one I have has been trimmed into a point and has fairly stuff bristles.

8. Cover Slots
I use round bases from EM4 to base the majority of my miniatures, and they come with a slot for miniatures with tabs. Cut up some heavy paper into little strips, then cut off the right sizes to cover up the slits that the integral base didn't cover. Use your brush and a little white glue on each side of the slot.

9. Apply Glue
Brush on your glue everywhere on the base, doing your best to avoid the miniature's feet or other low hanging bits.

10. Sand
I've collected a lot of different sand over the years from various beaches and other locations. I've found you don't want super fine sand, as the texture ends up being too smooth and doesn't dry brush well. Go for a mix of different sizes, and even add in some relatively larger stones or crumbles of cork for variety. Scoop your miniature into the sand, making sure you get the whole base covered. For larger models I'll go back and add some larger stones to take up space on the base and add visual interest. Add a dab of glue from your brush and place the stone down, then sprinkle a little sand over it to help make the transition smoother and help keep it in place. Alternatively you can add the larger stones first if you know for certain where you want them.


11. Clean the Base Edge
Run your finger along the edge of the base, making sure the edges are free of sand.
12. Clean Those Feet!
Despite the precaution of trying not to get glue on your models feet, it is going to happen. Use your blade to gently scrape down any sand that has crept onto the feet of your miniature. For miniatures with very small feet don't be afraid to leave a little space clear of sand. You don't want it to look like your figure is wading through the dirt. At this point you're going to want to leave the figure alone until the glue is dry (Don't forget to clean your glue brush!)

13. Sand Pt.2
You'll notice that miniatures with thicker integral bases have a very obvious transition now that the glue has dried. Take another pass, adding a little glue along this transition and dip them in the sand again. It can help if your tamp this down with your fingers, spreading it out until there is a natural slope. Let this sit and dry completely.

14. Seal
One thing I've found is that while you could call it done here, when you go to paint the base you'll have bits of sand breaking off as you drybrush. To prevent that, make a mix of 1pt glue to 2pts water. Get yourself another glue brush, mine is a very old and frayed soft bristle brush. Use this brush to coat the sand with a good layer of the glue mixture, again being careful not to get it up on the feet. This coat will take longer to dry, so I usually leave them overnight at this point.


15. Scrape
You'll likely have gotten some of the glue mixture along the sides of the base, as well as some sand coming loose and sticking itself to the edge. Take your fingernail and run it along the edge of the base and it'll clean right off.

16. Undercoat
Last bit of advise. I find that smaller scale miniatures really benefit from brighter colours. They need to stand out on the table, and they have so much less mass than 28s or larger. I recommend spraying them with a matte off-white colour. Just listen to the instructions on your rattle can and do several very light passes, starting the spray off to the side of your miniatures, then passing over them. Doing it this way prevents sudden blasts from gunking up the details.

FINISHED!
That was a lot, and I realize now writing it out it may seem a little much, but this method has served me well for many years. While it may be a little labour intensive I think the results are worth it! Happy Prepping!
Addendum: If you want to paint your miniatures before basing, the above steps still apply, just paint the integral base the same colour you intend to paint the sand and be extra careful when gluing the sand on and sealing it.

1. Remove Flash, Sprue and Tabs
These are the little tabs and bits you'll find on metal miniatures, and come from the casting channels that are carved into molds to allow the metal to flow properly. For some miniature parts such as the bow shown below there will be channels carved into the mold to get to particularly thin parts. Just nick these off with a sharp blade and smooth out any areas from larger channels.
Most mold makers are careful about where they place these so when they're trimmed off they aren't noticeable. Pay careful attention as sometimes bits get bent up and hidden, and there is little worse than finding a bit of it when you've mostly finished painting a miniature and have to trim it off and blend in the missed area!

Flash before and after
2. Mold Lines
These are a little trickier. Most miniatures are cast in a two part mold, though you'll occasionally find multi part molds for more dynamic sculpts. Along the lines where the molds meet, mold lines form, which are generally small ridges of metal. Use a duller blade when removing these and scrape at a 45 degree angle. More severe mold lines may require multiple passes, or in the worst cases some heavy scraping or even greenstuff on miniatures where the molds didn't line up properly.

Mold lines before and after
3. Base Prep
After cleaning up your miniature you'll want to make sure to clean any flash from the base you'll be using, or any splinters along the edges if using wood bases.
4. Trimming and Beveling
I prefer to center the heads of miniatures as close to the center of the base as possible. There are some exceptions, but I find this gives the best visual balance. This means that you may have to trim the integral base of the miniature if there would be overhang otherwise. Use either a sharp blade, or for thicker bases a pair of pinch cutters. For very thick integral bases I use a blade to shave off some of the excess at an angle around the edges for a better transition.

Base before and after trim with pinch cutters

Beveling a base, before and after.
5. Scoring
If you're basing a particularly a large miniature, or basing on a non textured base such as mdf or wood you'll want to score the bottom of your miniature with a blade in a cross hatch pattern. This gives the glue something to latch on to. If basing on mdf or wood I'd recommends scoring the base in the same fashion.

Scored base
6. Glue To Base.
Some miniatures I'll place beforehand and get an idea of where the integral base should be relative to the edge of the base before gluing. I tend to use superglue, though have had excellent results with wood glue when gluing 6mm scale miniatures to plywood bases. Apply the glue to the miniature's integral base and place it down.
7. White Glue
My wife got me a 1 gallon jug of white school glue last year, and previous to that I had just been buying smaller squeeze bottles after the school year had begun when they go on sale very cheaply. You'll want to squeeze a reasonable amount of glue onto a palette and find yourself a crappy old brush. The one I have has been trimmed into a point and has fairly stuff bristles.

Glue and brush
8. Cover Slots
I use round bases from EM4 to base the majority of my miniatures, and they come with a slot for miniatures with tabs. Cut up some heavy paper into little strips, then cut off the right sizes to cover up the slits that the integral base didn't cover. Use your brush and a little white glue on each side of the slot.

Heavy paper strips and covered slot
9. Apply Glue
Brush on your glue everywhere on the base, doing your best to avoid the miniature's feet or other low hanging bits.

Base with white glue applied
10. Sand
I've collected a lot of different sand over the years from various beaches and other locations. I've found you don't want super fine sand, as the texture ends up being too smooth and doesn't dry brush well. Go for a mix of different sizes, and even add in some relatively larger stones or crumbles of cork for variety. Scoop your miniature into the sand, making sure you get the whole base covered. For larger models I'll go back and add some larger stones to take up space on the base and add visual interest. Add a dab of glue from your brush and place the stone down, then sprinkle a little sand over it to help make the transition smoother and help keep it in place. Alternatively you can add the larger stones first if you know for certain where you want them.

Sand and small stones

Adding stones before sand
11. Clean the Base Edge
Run your finger along the edge of the base, making sure the edges are free of sand.

Before and after
12. Clean Those Feet!
Despite the precaution of trying not to get glue on your models feet, it is going to happen. Use your blade to gently scrape down any sand that has crept onto the feet of your miniature. For miniatures with very small feet don't be afraid to leave a little space clear of sand. You don't want it to look like your figure is wading through the dirt. At this point you're going to want to leave the figure alone until the glue is dry (Don't forget to clean your glue brush!)

Feet before and after cleaning

Another example
13. Sand Pt.2
You'll notice that miniatures with thicker integral bases have a very obvious transition now that the glue has dried. Take another pass, adding a little glue along this transition and dip them in the sand again. It can help if your tamp this down with your fingers, spreading it out until there is a natural slope. Let this sit and dry completely.

Base gap before and after
14. Seal
One thing I've found is that while you could call it done here, when you go to paint the base you'll have bits of sand breaking off as you drybrush. To prevent that, make a mix of 1pt glue to 2pts water. Get yourself another glue brush, mine is a very old and frayed soft bristle brush. Use this brush to coat the sand with a good layer of the glue mixture, again being careful not to get it up on the feet. This coat will take longer to dry, so I usually leave them overnight at this point.

Mixing the glue

Sealed
15. Scrape
You'll likely have gotten some of the glue mixture along the sides of the base, as well as some sand coming loose and sticking itself to the edge. Take your fingernail and run it along the edge of the base and it'll clean right off.

Cleaning off sand after sealing
16. Undercoat
Last bit of advise. I find that smaller scale miniatures really benefit from brighter colours. They need to stand out on the table, and they have so much less mass than 28s or larger. I recommend spraying them with a matte off-white colour. Just listen to the instructions on your rattle can and do several very light passes, starting the spray off to the side of your miniatures, then passing over them. Doing it this way prevents sudden blasts from gunking up the details.

Sprayed
FINISHED!
That was a lot, and I realize now writing it out it may seem a little much, but this method has served me well for many years. While it may be a little labour intensive I think the results are worth it! Happy Prepping!
Addendum: If you want to paint your miniatures before basing, the above steps still apply, just paint the integral base the same colour you intend to paint the sand and be extra careful when gluing the sand on and sealing it.

6mm scale figures painted before basing
Miniatures featured are produced by the following companies: Perth Pewter, Battle Valor Games, Ral Partha Europe, Splintered Light Miniatures, Perfectsix, Microworld
Bases from: Em4, Litko
Bases from: Em4, Litko


Comments
Post a Comment